How to setup YSF2DMR on pi-star
In this blog entry I will talk about setting up YSF2DMR on pi-star (on a generic MMDVM device). I’ll try to be brief and not too detailed.
Getting a DMR ID
- Go here and get a DMR ID.
- Go here and get a Brandmeister login.
- Go here and follow the instructions to get a Hotspot Security Password.
Setting up Pi-Star
I will not talk about how to install pi-star, there are many good tutorials on the web. Always get the latest version of the pi-star software.
Go to pi-star Configuration page.
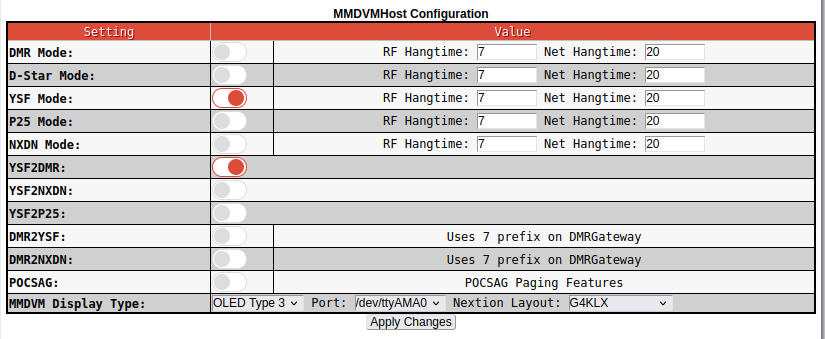
- Toggle YSF Mode on
- Toggle YSF2DMR on
- Click on Apply Changes button. Wait for pi-star to apply the configuration.
- In the General Configuration section make sure that CCS7/DMR ID is populated with your Radio ID that you got after registering with Radio ID (Link Above).

Yaesu Section Configuration
- Under Yaesu System Fusion Configuration section:
- I usually leave the YSF Startup Host blank. But it really doesn’t matter. If you will use it JUST for YSF2DMR, then maybe you might want to leave it connected to: YSF00002 That’s the default YSF2DMR channel.
- Toggle UPPERCASE Hostfiles on
- Toggle WiresX Passthrough on (This one actually enables code not to be interpreted by the WiresX node, we will need this to be able to switch to a Talk Group on the fly)
- (YSF2DMR)CCS7/DMR ID field choose as 01
- DMR Master: Choose one server that is near you. I use BM 3103 as it’s close to me. That’s a Brandmeister server in the USA.
- Hotspot Security: Enter here the password that you created with Brandmeister as Hotspot Security. (Link Above)
- DMR TG: This is the ID for the Initial Talk Group that you want to connect. I usually leave this 00091. Talk Group for World Wide.
- Here apply the changes and you should be good to go.
Setting up the radio
I’ll be talking about setting in Yaesu FT3D, but it is similar for most.
- Dial the radio to the frequency that you set up under General Configuration -> Radio Frequency.
- Press the X button (WiresX button).
- Once you connect the MMDVM, press Search & Direct button.
- Then press the Search & Direct button again (on the second screen)
- You will see an ID button on the top left. Press that. This will change the input to 5 digits only.
- Type the number: 00002 and press ENT. This will connect the MMDVM to YSF00002 room. This room is the YSF2DMR room.
- Then press Search & Direct two times in two different screens again.
- And press ID again.
- From this point on you can only change Talk Group IDs. You will be in YSF2DMR (YSF00002) room but will be able to switch DMR Talk groups by entering their IDs.
- Try your first group something like 00091 (This is TG91 World-Wide DMR channel)
- Congrats! :)
Some tips
- Sometimes you need to do a quick press to the talk button, I really don’t know why…
- You can press and hold BAND button to leave the WiresX or YSF group.
I’ll update this entry if I see things changing. 73!
